|
|
Canopy Installation Instructions
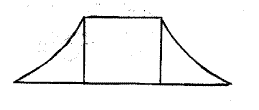
 All polymer canopy roofs are designed to be installed
supported over a Bay or Garden window (see window instructions) or
installed freestanding, as over a door, with a supporting soffit system All polymer canopy roofs are designed to be installed
supported over a Bay or Garden window (see window instructions) or
installed freestanding, as over a door, with a supporting soffit system
This system can be purchased as an accessory or be built on site using
plans provided.
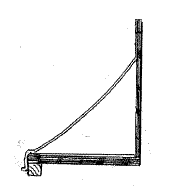
All polymer canopies are designed to be installed with auxiliary trim
casing provided by
others. This trim casing is fastened to the bottom of the soffit system
as shown here.
Or the top of a window (not shown) The size of this piece is 1”x2” but
could be any size 1”x_ as per installers design, it could cover the
entire soffit if desired.
- Install trim casing as shown above.
- Caulk surface of flashing and other nailing
surfaces of roof where it meets soffit and building.
- Attached the canopy to the trim casing with
screws supplied with roof.
- Attach the canopy to the building with galvanized
nails using the holes provided in the flashing or predrlll a hole
larger than the shank of the nail, leave room for expansion. Do not
nail tight.
- Install siding, do not nail through the flashing.
- No other finishing of canopy is necessary and may
void warranty.
- Care must be taken to insure that canopy soffits
are installed securely so that they do not sag etc. The canopy roof
is designed to provide style and weatherability. They are strong but
are not designed to support themselves or the building components
they protect.
Canopy Soffit Assembly Instructions
This part allows the canopy to be installed without under bracing or
brackets. The assembled part is fastened to the building to create a
firm base for the canopy.
It is suggested that all parts be glued and screwed together.
Each unit in made up of 4 four different parts, 1-each of part A
Soffit.1-each of part B Back, 2-each of part C Soffit Brace and see 2.
below for quantity for part D Rafter/Brace.
- The Back is centered on the long edge of the
Soffit and fastened to the Soffit.
- The Rafter/Brace parts are installed fastened to
the Back and the Soffit. 2 parts for the 30MG, 3 for the 40MG and 4
for the 60MG. Put one rafter/brace on each
end and put additional braces for 40MG and 60MG in the center.

- The Soffit braces are installed from the inside
corner of the Rafter/Brace at an angle toward the outside corner of
the Soffit one on each corner. This part is used to stiffen the
Soffit at this point.

See soffit plans for detailed drawings of parts
4/1/2004

For more information or to place an order
please call 802 257 2011.
|
|
 All polymer canopy roofs are designed to be installed
supported over a Bay or Garden window (see window instructions) or
installed freestanding, as over a door, with a supporting soffit system


